 USD ($)
 INR (₹)
 SAR (SAR)
 AED (AED)
Do you always trust emails sent from your domain? What happens if someone pretends to be you? Spoofing means someone is pretending to be you to steal information or credentials. To stop this, Microsoft uses special methods to check emails are real as they move around.
Three key methods – SPF, DKIM, and DMARC – help protect your domain in Exchange Online from phishing or being impersonated. DKIM is especially important because it uses a digital signature to make sure emails aren’t fake.
Many businesses like to use DKIM because it adds a secure signature to all emails. This tells the email server that the email is okay and helps avoid mistakenly marking emails as spam.
Let’s not wait any longer. We’ll explain what DKIM is and how to configure it to keep your domain safe.
Table of Contents
Exchange Online Email Authentication Methods
Exchange Online Protection employs SPF, DKIM, and DMARC as a defence trio against email spoofing and phishing threats. For Microsoft’s default domains, both SPF and DKIM validations are automatically activated. However, when it comes to custom domains, these email validation methods need to be enabled manually under specific circumstances, although Microsoft takes care of the DKIM setup for these domains.
- Sender Policy Framework (SPF) – SPF verifies if IP addresses are authorised to send emails by checking SPF TXT records in the domain’s DNS.
- DomainKeys Identified Mail (DKIM) – DKIM secures outbound emails by attaching a digital signature using a private key, while a public key is used by the recipient’s server to decrypt and verify the email’s authenticity.
- Domain-based Message Authentication, Reporting, and Conformance (DMARC) – DMARC ensures that emails pass both SPF and DKIM checks. It verifies SPF by comparing the ‘From’ address with the ‘Return-Path’ field and checks DKIM by matching the domain in the DKIM ‘d’ tag with the ‘Return-Path’ field. Note, DMARC isn’t automatically turned on for .onmicrosoft domains.
At this point, we understand the crucial techniques needed to shield your domain from spoofing attacks. However, DKIM stands out as a favoured choice among many organisations. This is because DKIM encrypts emails with a digital signature, helping maintain the domain’s reputation and protect against spoofing within the organisation and from external sources. With this in mind, let’s take a closer look at DKIM and learn about the best ways to set it up.
Microsoft 365 Domain Keys Identified Mail (DKIM)
Microsoft 365 uses something called DKIM, which stands for Domain Keys Identified Mail, to make sure emails are really coming from where they say they are. DKIM works by adding a special digital signature to the email. After an email is sent, the place that gets the email checks this signature to confirm it’s legit.
How it does this is pretty cool: it scrambles up parts of the email using a secret code, or private key, which only the sender knows. Then, when the email arrives, the receiving side uses a public key, which anyone can see and is listed in the domain’s DNS records, to unscramble the message and make sure it matches up.
Even though Microsoft sets up DKIM for you, whether you’re using a Microsoft domain (like .onmicrosoft.com) or your own custom one, there are times, especially when you have several custom domains, where you might need to step in and handle DKIM settings yourself. This gives you more control over making sure your emails are authenticated correctly.
Why is it Important to Enable DKIM for Custom Domains in Microsoft 365?
While Microsoft does manage DKIM for custom domains, there are specific scenarios where manual activation is required. These include:
- Having one or more custom domains.
- Preparing to implement DMARC.
- Desiring control over your private key.
- Needing to modify CNAME records.
- Using a third-party domain for sending emails.
These situations underline the importance of organisations taking charge of DKIM settings. Doing so enhances email validation and maintains a strong reputation with email services.
How to Enable DKIM in Microsoft 365?
To improve your domain’s reputation within your Microsoft 365 setup, you can activate DKIM by one of the following methods:
– Turn on DKIM through the Microsoft 365 Defender Portal.
– Set up DKIM using PowerShell in Microsoft 365.
Turn on DKIM through the Microsoft 365 Defender Portal
To activate DKIM in the Microsoft 365 Defender portal, follow these detailed steps:
1. Start by going to the following location to access the DKIM settings:
Microsoft 365 Defender → Email & Collaboration → Policies & rules → Threat policies → Rules → Email authentication settings → DKIM
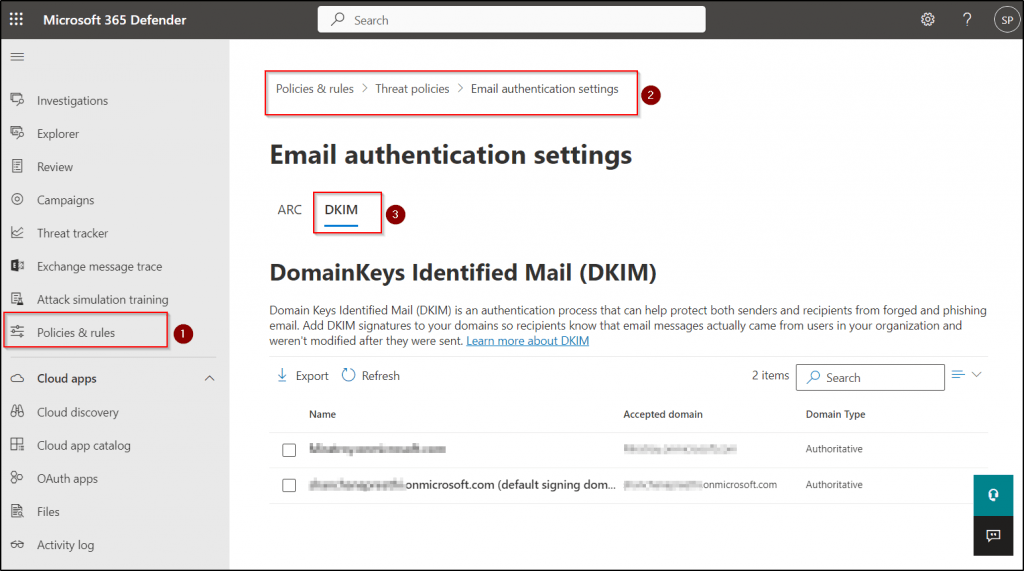
2. Choose the domain you’re interested in. If this is your initial setup for DKIM on this domain, you’ll notice a notification indicating “No DKIM keys saved for this domain.”
3. Proceed by clicking the “Create DKIM keys” button found at the page’s end to retrieve the selector records.
4. Upon selecting the “Create DKIM keys” button, the CNAME records will be shown in a pop-up window, ready for you to publish.
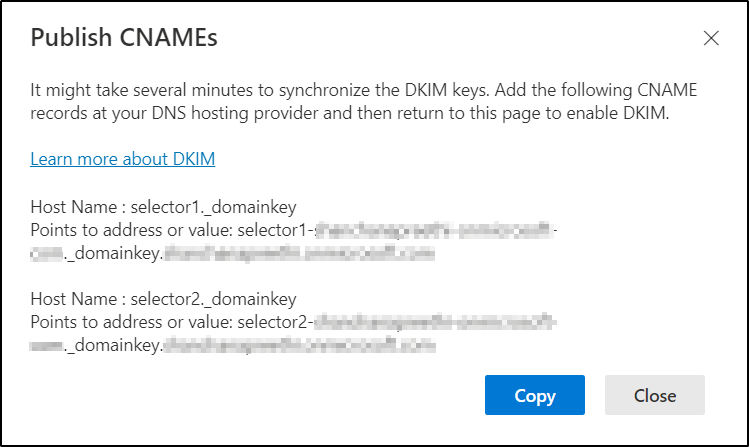
5. Take the CNAME records you’ve been given and add them to your domain’s DNS settings.
6. Once you’ve inserted those records, return to the DKIM configuration page for the next steps.
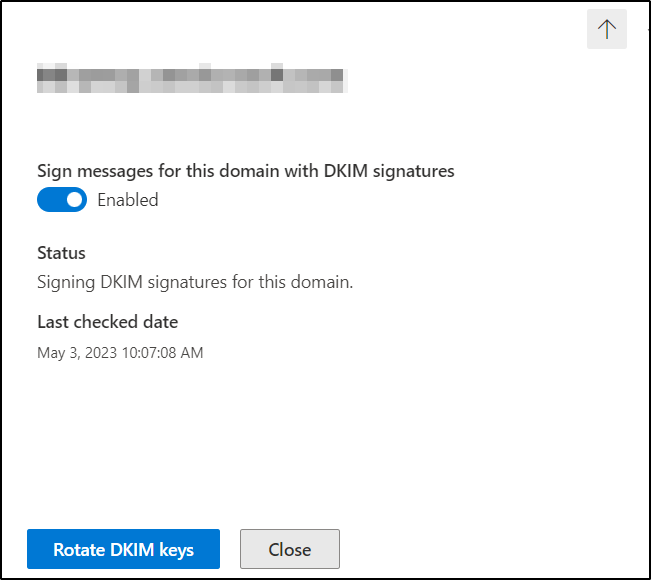
7. Then, adjust the toggle for “Sign messages for this domain with DKIM signatures” from Disabled to Enabled in the settings menu.
8. If an error pops up saying “CNAME record doesn’t exist,” give it a few hours for the records to sync up. It’s also a good idea to double-check your work for any mistakes made during the copy and paste of the records.
9. If you’re still running into trouble, try going through the steps again carefully to avoid any errors.
Now that we’ve gone through enabling DKIM via the Defender portal, let’s move on to how you can manually set it up using PowerShell.
Configure DKIM in Microsoft 365 Using PowerShell
To set up DKIM for Microsoft 365 using PowerShell, follow these instructions:
- Start by connecting to the Exchange Online PowerShell module.
- The key step is to create two CNAME records for each of your additional custom domains. This step is crucial for enabling DKIM signatures for these domains.
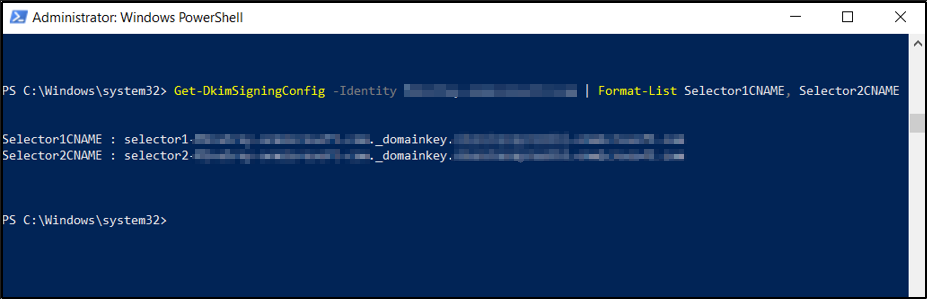
- DKIM selectors are used to pinpoint the exact location of the public key, allowing receiving servers to locate and verify the public key. You can generate the selector records for your additional domains by running specific PowerShell cmdlets.
Get-DkimSigningConfig -Identity <domain> | Format-List Selector1CNAME, Selector2CNAME
Remember, in this situation, you’ll need to manually input the DKIM selectors.
4. After setting them up, enter the created CNAME records into your domain’s DNS settings. It’s important to note that even though the second record might point to a non-existent address, it’s crucial for enabling a smooth rotation of DKIM keys.
IMPORTANT: If you come across an error message stating “No DKIM keys saved for this domain,” you can resolve it by enabling DKIM signing. Simply replace “<Domain>” with your actual domain name and run the following PowerShell cmdlet:
Get-DkimSigningConfig -Identity <domain> | Format-List Selector1CNAME, Selector2CNAME
DKIM Key Rotation in Microsoft 365
The rotation of DKIM keys in Microsoft 365 involves generating a fresh set of public and private keys to authenticate emails and safeguard domain identity. To reduce the risk of these keys being compromised, it’s recommended to update them every six months. Let’s explore the steps to perform DKIM key rotation in Microsoft 365.
Rotate DKIM Keys in Microsoft 365 Defender Portal:
Go to the DKIM settings within the Defender portal, and initiate the rotation of DKIM encryption keys by selecting the “Rotate DKIM keys” button.
Rotate DKIM Keys Using PowerShell:
To adjust the bit length of DKIM keys in Microsoft 365 after setting up DKIM, execute the specified commands.
Rotate-DkimSigningConfig -KeySize 2048 -Identity <DkimSigningConfigIdParameter>
Verify DKIM Configuration in Microsoft 365
After configuring DKIM, you can check if it’s working correctly by sending emails from your custom domain to Outlook.com or Hotmail.com. Another way to verify DKIM is by examining the message headers in Outlook. However, avoid using aol.com for DKIM verification, as it bypasses DKIM checks if the SPF validation passes.
How to Disable DKIM in Microsoft 365?
Disabling DKIM for a custom domain in Microsoft 365 doesn’t result in its complete deactivation. Microsoft employs a default policy that automatically creates and activates DKIM for that specific custom domain, effectively keeping DKIM in an enabled state. Therefore, to fully disable DKIM in your Microsoft 365 environment, it’s necessary to turn off DKIM for both your custom and default domains. In the following section, we’ll go through how to disable DKIM in Office 365.
1. To turn off DKIM in Microsoft 365, access the Defender portal and follow the specified navigation path.
Microsoft 365 Defender 🡢 Email & Collaboration 🡢Policies & rules 🡢Threat policies 🡢Rules 🡢Email authentication settings 🡢DKIM
2. On the DKIM settings page within the Defender portal, pick the domain you wish to configure.
3. Then, switch the “Enabled” toggle to “Disabled” for that particular domain.
4. If you prefer using PowerShell to disable DKIM, first ensure you are connected to the Exchange Online PowerShell module.
5. To deactivate DKIM for a specific domain via PowerShell, execute the following command
$Dkimpolicy = Get-DkimSigningConfig -Identity <Domain>
$Dkimpolicy[0] | Set-DkimSigningConfig -Enabled $false
Conclusion
Configuring DKIM (DomainKeys Identified Mail) for Office 365 is a vital step towards enhancing the security and integrity of your email communication. By validating outbound email messages with digital signatures, DKIM plays a crucial role in protecting your domain from spoofing and phishing attacks, thus maintaining your organization’s reputation.